It’s that time again to explore a new mathematical technology tool! Today we will explore a Geometry program called GeoGebra. ![]()
GeoGebra is a free mathematics program for all levels of education that includes geometry, algebra, tables, graphing, statistics, and calculus into one easy app/software (About GeoGebra). GeoGebra can be used to show simple geometric relationships to very complex geometric properties. It makes learning an abstract concept more meaningful, allows students to visualize related concepts and see how they affect each other, and builds student’s conceptual understanding. According to Principles to Action, “Interactive (dynamic) geometry applications allows exploration of geometric conjectures–including those in coordinate, transformational, and synthetic contexts–since dragging the objects preserves the underlying relationships among them in well-constructed diagrams” (National Council of Teachers of Mathematics [NCTM], 2014, pp. 78). Today’s exploration will include constructing and labeling figures and transforming figures. We will see how the use of GeoGebra builds student’s understanding in these explorations.
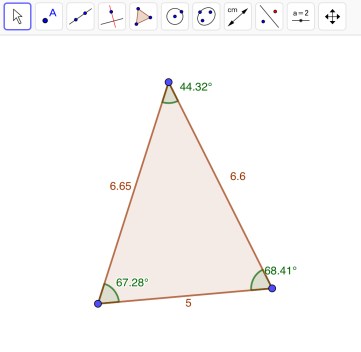
 We can use GeoGebra to create figures such as triangles, parallelograms, squares, rectangles, trapezoids, and kites. Although I have named several figures we can construct using GeoGebra, there are many more possible figures. “Constructing involves using the properties of the figure in its creation” (Dick & Hollebrands, 2011, pp. 33). Today, we will explore how to construct a few of these figures. Let’s start off with a triangle. Click on the “Polygon” tool and then click in 3 different places. View the image to the left. Once you have created your triangle, you can add in labels of angles and side lengths. To display the angle measures, click on the “Angle” tool. You will need to click on all of blue points. To display the length measures, click on the “Distance or Length” tool and then click on all the sides of the triangle. The image below includes all of the measures. There are many more features that can be displayed in GeoGebra, one example being the area of the triangle.
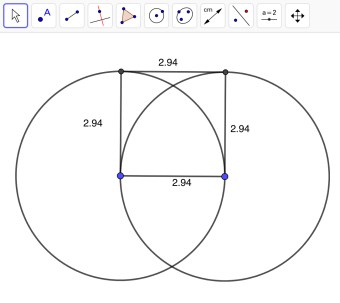
 Let’s construct a square. Start by constructing a circle. You can do this by clicking “Circle with Center through Point” and clicking in two different places. Construct another circle using the same tool by clicking the point on the right and then the center of the previous circle. View the image to the right. Next, click on the “Segment” tool and connect the two center points of the circles. Once you have done that, click on the “Perpendicular Line” tool and construct two perpendicular lines on either end of the line segment you previously created. You can do that by double tapping on the two center points of the circles. Once you have two perpendicular lines, you will need to connect them using a line segment at the top of both circles. When you have done that, you can hide the perpendicular line by holding the line and selecting “Show Object”. Connect all of the lines and you will have constructed a square. We can check to make sure all of the sides are the same by selecting the “Distance or Length” tool. View the square below. However, I want you to keep in mind, it is possible to construct these figures in more than one way.
When constructing figures, it is important for students to conduct drag tests to make sure the figures they have constructed is in fact correct. “Once a geometric object has been constructed, the geometrical relations that were used in its construction retain their integrity when the object is dragged” (Dick & Hollebrands, 2011, pp. 33). The task shouldn’t be about constructing a single figure, but rather creating a figure so that whenever a point is dragged, the figure will remain the same. The great part about using GeoGebra to construct these figures is how precise the program is. If the students were to construct this figure on paper, it will most likely not be exact. To explore more figures and step by step how to construct figures, click Introduction to GeoGebra.
 Technology such as GeoGebra “allows students to perform transformations with more accuracy, to explore their properties, and to consider what happens when two or more transformations are composed” (Dick & Hollebrands, 2011, pp. 41). Students discover important properties through their own investigations. Let’s go through a transformation called rotation. A rotation is a transformation where a figure turns around a fixed center point. In other words, the center of rotation is fixed and everything else on the plane rotates about that point. The first step of rotating a figure is constructing the figure. Click on the “Regular Polygon” tool and construct a square. Once you have your square, click on “Slider”. When the settings for the Slider come up, click on “Angle”. When you have the slider, click on “Rotate around Point”. When the menu for that pops up, type in what your slider is labeled. View the image on the left. The unlabeled square is the rotation you just made. You should end up being able to rotate your new figure using the slider. Even though I showed you how to construct one transformation, there are several more I encourage you to explore.
In conclusion, we have explored how to construct figures and how to perform a transformation. When students have the opportunity to use programs such as GeoGebra, they not only learn geometric concepts, but also build in-depth connections between the relationships. “Geometry, which is an area of mathematics that many describe as visual, would seem to lend itself naturally to technological tools that provide students with opportunities to create, view, and manipulate visual representations of geometrical objects” (Dick & Hollebrands, 2011, pp. 33). It also provides opportunities for students to explore problems that may have been more difficult otherwise. GeoGebra helps students think about behaviors they wouldn’t normally think of such as the drag test. For more information on the features of Geogebra, click here.
Resources
About GeoGebra. (n.d.). Retrieved October 27, 2018, from https://www.geogebra.org/about
Dick, T., & Hollebrands, K.F. (Eds.) (2011). Focus in high school mathematics: Technology
to support reasoning and sense making. Reston, VA: National Council of Teachers of
Mathematics.
National Council of Teachers of Mathematics. (2014). Principles to actions: Ensuring
mathematical success for all. Reston, VA: Author.
